Making your first call with dialnote takes just a few clicks. Once you've got a phone number set up, you're ready to experience HD voice quality and see how AI call summaries work. Let's walk through the process.
Before You Start#
Make sure you've completed these steps from Account Setup:
- A phone number — You need at least one dialnote number. If you don't have one yet, see Getting Numbers.
- Microphone access — Your browser will ask for microphone permission the first time. Click "Allow" when prompted.
- Audio check — Go to Account Settings → Audio Test to run a quick preflight check. It tests your mic, speakers, browser compatibility, and network connection in about 10 seconds.
Enable notifications too
When dialnote asks to send browser notifications, click "Allow." You'll get desktop alerts for incoming calls even when the app isn't in focus. You can manage this later in Settings → Notifications.
Opening the Call Pane#
Click the phone icon in the navigation bar or press Make a Call Now on your Quick Start page. This opens the Call Pane — a floating, draggable dialer that stays accessible while you work.
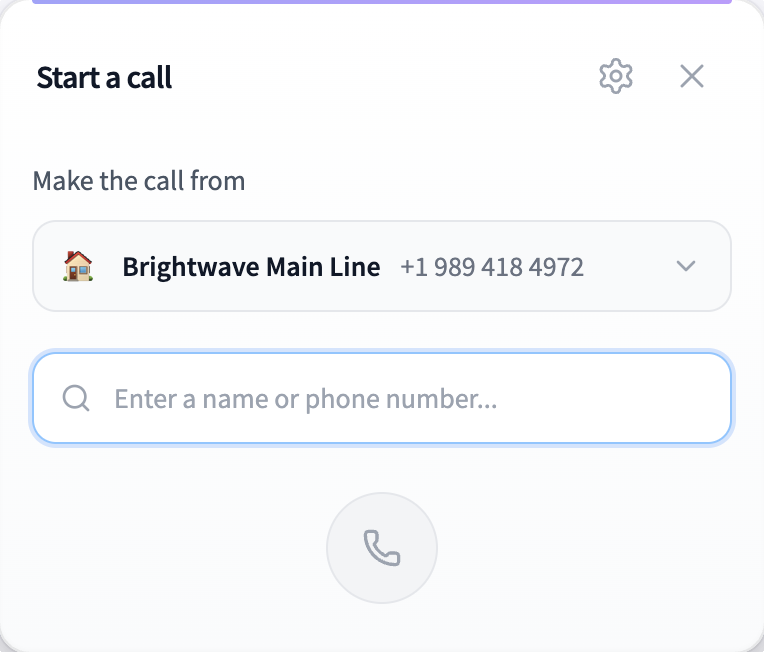
The Call Pane shows:
- A phone number input field where you type or paste the number you want to call
- A dropdown to select which of your dialnote numbers to call from
- Call controls that appear once you're connected
You can also start a call directly from a contact's profile or from the Inbox. Click the phone icon next to any contact's number, and the Call Pane opens with their number pre-filled.
Making an Outbound Call#
Here's how to place your first outbound call:
- Enter the phone number — Type the number you want to call, or start typing a contact's name to search and auto-dial
- Select your "From" number — Choose which dialnote phone number should appear as the caller ID. If you've set up a Caller ID, the recipient sees that number instead.
- Click the call button — The green phone icon starts the call
You'll see the call state change from "Dialing" to "Ringing" as the recipient's phone rings. Once they answer, you're connected and the call timer starts.
Before placing a call, click the gear icon in the dialer header to pick your preferred microphone and speaker. dialnote remembers your selection for future calls.
Call Controls During a Live Call#
While on a call, you've got several controls at your fingertips:
| Control | Shortcut | What it does |
|---|---|---|
| Mute | Ctrl+M | Silence your microphone without ending the call |
| Hold | Ctrl+H | Put the other person on hold with music |
| Keypad | Ctrl+K | Open the dial pad for extensions or menu options |
| Record | — | Start, pause, or resume call recording |
| Add Participant | — | Bring another person into a conference call |
| Transfer | — | Transfer the call to another team member or number |
| End Call | Esc | Hang up |
The participants list shows everyone on the call along with their connection status. For outbound calls, you'll see the callee's status change from "connecting" to "connected" when they pick up.
Need to enter an extension or respond to an automated menu? Open the keypad during the call, and dialnote sends DTMF tones through the active connection. You can also press number keys (0–9), *, and # directly on your keyboard.
Recording permissions
Call recording controls only appear if you've enabled recording in your phone number settings. If auto-record is on, recording starts automatically when the call connects.
Receiving Your First Inbound Call#
When someone calls your dialnote number, you'll get a desktop notification and the Call Pane pops up showing:
- The caller's phone number (and name, if they're in your contacts)
- Options to accept or decline the call
Click the green accept button (or press Enter or Space) to answer. Click the red decline button to send the call to your next routing action — like voicemail, another team member, or your AI agent.
Let AI answer for you
If you've set up an AI agent, it can answer calls automatically and transfer to you when needed. This is great for after-hours calls or when you're on another line.
After the Call Ends#
Once you hang up, dialnote's AI processes the call automatically (if transcription is enabled on your phone number). Within a few seconds, you'll find:
- A full transcript of the conversation
- An AI-generated summary highlighting key points
- Action items extracted from the discussion
- The call logged in your Inbox for easy reference
Head to your Inbox to review everything. This is where dialnote really shines — no more scribbling notes during calls or forgetting what was discussed.
Troubleshooting First Call Issues#
If your first call doesn't connect, check these common issues:
- Microphone permissions — Your browser needs access to your microphone. Look for a blocked microphone icon in the address bar and click it to allow access.
- Phone number not active — Make sure your dialnote number is fully set up in Settings → Phone Numbers
- Network connection — dialnote calls need a stable internet connection. Wi-Fi or wired ethernet works best. Run the audio test in Account Settings to check your connection.
For more help, see the Call Quality and Network Setup troubleshooting guides.
Audio quality matters
For the best call quality, use a headset with a good microphone. Built-in laptop mics can pick up background noise and cause echo.
What's Next#
Now that you've made your first call, here's what to explore:
- Set up an AI agent — Let AI handle calls when you're unavailable
- Configure call routing — Direct incoming calls to the right team members
- Import your contacts — So dialnote recognizes callers by name
- Connect your CRM — Auto-log calls to HubSpot, Salesforce, or Pipedrive
- Learn about call recording — Record calls for training and compliance